Alexa rank is somehow important factor that attract different types of brands and advertiser towards your blog. Getting a good Alexa rank comprises of many factors like frequency of posting article, social media exposure and number of daily impression.
Many bloggers struggles a lot to improve the rank of blog but only 10% of them succeed in their path.
Alexa widget installed on your blog is one of the factor that decide your rank. Generally Alexa site predict rank of a blog based on last 3 month traffic data so if you add Alexa widget on your blog it accurately measures your blog traffic and your Alexa rank will be more accurate.
Suppose when you visit an Photography shop there you see prizes and certificate fitted around the walls which shows their popularity and creativity among the people. Just like that it is the Certificate of your blog's popularity which you have to shown up to your readers.
Don't ask me questions like why you are not using Alexa widget? We are sharing tricks here based on my personal experience and it may not help you always, make a habit of test everything you don't know which technique work for you. So lets proceed to add this widget on blog.
This widget you can either install in sidebar or footer section of blog. Lets discuss one by one both of these.
How to Install Alexa Widget On Sidebar
Installing widget in sidebar is somehow easy than installing it in footer part you have place whole code once without touching source template file.
First you have to build Alexa widget for your blog for this follow this link and choose favorite layout for your widget. Now there is some JavaScript code in your hand which you have to add in sidebar or footer.
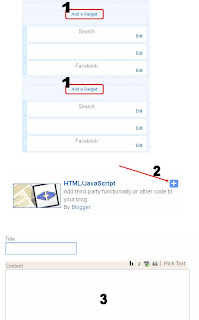
Login to Blogger.com and click on your blog title, Go to Layout / Add a Gadget / HTML / JavaScript now paste your widget code inside the box appeared and click Save button.
How To Install Alexa Widget On Footer
Installing it in footer part is somewhat tricky and very much dependent upon the customization of your template. If your template is systematically arranged and there is Add a Gadget option available in footer part under layout option then installing procedure will be same as above.
But if template is heavily customized and no such option available then manual customization can be carried out and you have to edit your template.
You can paste this code just below any one of these tag and make sure that you get desired result after saving template.
<div id='footer-wrapper'>
OR
<div id='footer1'>
We consider that newbie may find difficulty in adding widget if you are one of them just relax and comment below we will solve your problem as soon as possible :))
Many bloggers struggles a lot to improve the rank of blog but only 10% of them succeed in their path.
Alexa widget installed on your blog is one of the factor that decide your rank. Generally Alexa site predict rank of a blog based on last 3 month traffic data so if you add Alexa widget on your blog it accurately measures your blog traffic and your Alexa rank will be more accurate.
Suppose when you visit an Photography shop there you see prizes and certificate fitted around the walls which shows their popularity and creativity among the people. Just like that it is the Certificate of your blog's popularity which you have to shown up to your readers.
Don't ask me questions like why you are not using Alexa widget? We are sharing tricks here based on my personal experience and it may not help you always, make a habit of test everything you don't know which technique work for you. So lets proceed to add this widget on blog.
This widget you can either install in sidebar or footer section of blog. Lets discuss one by one both of these.
How to Install Alexa Widget On Sidebar
Installing widget in sidebar is somehow easy than installing it in footer part you have place whole code once without touching source template file.
First you have to build Alexa widget for your blog for this follow this link and choose favorite layout for your widget. Now there is some JavaScript code in your hand which you have to add in sidebar or footer.
Login to Blogger.com and click on your blog title, Go to Layout / Add a Gadget / HTML / JavaScript now paste your widget code inside the box appeared and click Save button.
How To Install Alexa Widget On Footer
Installing it in footer part is somewhat tricky and very much dependent upon the customization of your template. If your template is systematically arranged and there is Add a Gadget option available in footer part under layout option then installing procedure will be same as above.
But if template is heavily customized and no such option available then manual customization can be carried out and you have to edit your template.
You can paste this code just below any one of these tag and make sure that you get desired result after saving template.
<div id='footer-wrapper'>
OR
<div id='footer1'>
We consider that newbie may find difficulty in adding widget if you are one of them just relax and comment below we will solve your problem as soon as possible :))
No comments:
Post a Comment